If you were following along with last week’s user test of Alice Medrich’s Peanut Crunch Brownies, then you might recall that I found myself sans a key ingredient when it came time to make said brownies. Yup, not a spoonful of crunchy, salted natural peanut butter in the house. Crap. While I will happily make peanut butter treats for other people, I’m not really a fan (see my post about PB&J cookies). Pecan Butter? Yep! Almond butter? Bien sûr! But peanut butter? Meh. And yet, I’m willing to keep giving it a chance when the opportunity to try out some new sweet recipe happens along.
What I did find was a tub of unroasted, unsalted peanuts. (And no, I have no idea why. I’m sure there was a get-around-to-it recipe that inspired that purchase.) Hey, when life gives you peanuts…well, you know what to do. For those of you are peanut butter lovers, well, today is your day. Seriously, it’s National Peanut Butter Lovers Day, so get inspired to DIY!

Making peanut butter at home is super-easy and has the added benefit of letting you tweak the sticky stuff to your liking. And good news for those of you following diets that limit your salt or sugar intake: you don’t have to hunt down commercial peanut butter brands when you can make your own — fresh! (Low FODMAPs folks, rejoice! You can use simple syrup, golden syrup, or maple syrup to sweeten your peanut butter!) When you DIY, you can have it your way.
Recipe: DIY Crunchy Peanut Butter
This recipe makes 8 ounces of peanut butter, which is enough for a batch of Peanut Crunch Brownies, with a little left over for noshing while you wait for the brownies to bake. For a creamy peanut butter variation, skip steps 4 and 5 and just grind the whole batch of roasted peanuts.
Ingredients:
8 ounces unroasted, unsalted peanuts
Liquid sweetener (optional): rich simple syrup, honey, golden syrup, maple syrup, or agave nectar
Salt (optional)
What you need:
Half sheet pan, lined with parchment paper
Food processor
Rubber spatula
Measuring spoons
Small mixing bowl
How to:
- Preheat oven to 325° F. Arrange the peanuts in a single layer on parchment paper-lined sheet pan.
- Roast peanuts for 10-12 minutes, turning the pan and stirring peanuts so that they color evenly.

Can you see it? Peanut butter waiting to happen. I like a light roast with a golden color. If you like a more roasty flavor, you can roast the nuts for as long as 15 minutes. Make sure you turn the pan and stir the nuts at five-minute intervals. You don’t want to roast them too long, or they’ll take on a bitter flavor.
- Let nuts cool to room temperature.
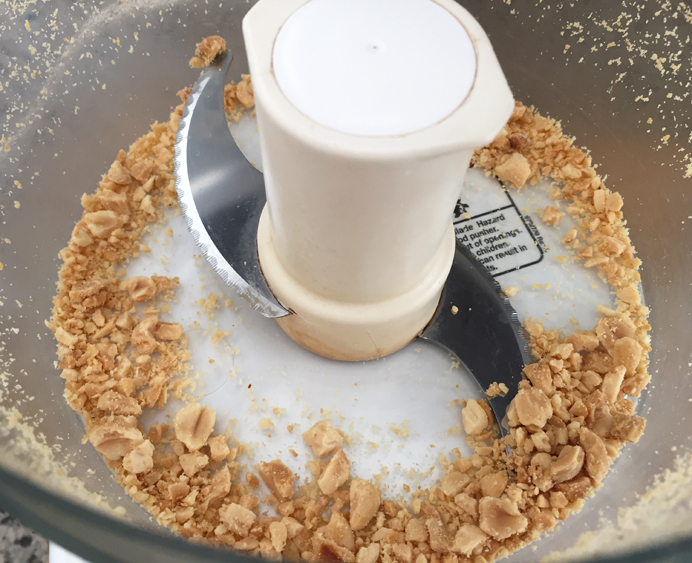
- Place 1.2 ounces (about 3 rounded tablespoons) of roasted nuts in the food processor and pulse until chopped.

Making the “crunchy” part of crunchy peanut butter In my food processor, this took about 8 pulses, give or take. Want smaller pieces? Pulse more.
- Remove chopped nuts from the food processor and set aside.
- Place remaining peanuts in the food processor bowl, attach the blade and lid and process until smooth, 4 to 5 minutes. Stop the processor about halfway through (at the 2 to 2½ minute mark) to scrape down any crumblies from the side of the bowl.
After 45-60 seconds, you’ll have peanut “powder,” and after 1½ minutes, you’ll have a crumbly “dough.”
After 90 seconds of processing Keep going. After about 2 minutes, you’ll have peanut paste, at which point you’ll want to scrape down the bowl.

Nope, not ready yet. I usually let my peanut butter go about 5 minutes so that it’s realllly smooth.
- Scrape the smooth peanut butter from the food processor bowl into the mixing bowl and add the chopped peanuts, mixing with a rubber spatula to combine.
- Optional: Add salt to taste.
Taste the peanut butter first. Does it need salt? If so, start with ⅛ teaspoon. Sprinkle the salt on top of the peanut butter, mix in thoroughly, then taste. You’ll taste the salt on the back of your palate, so take a minute for the flavor and saltiness to register before deciding to add more. Be conservative when adding more salt: sprinkle on a pinch (or 1/16 teaspoon), mix it in, then taste. Repeat until your peanut butter has the right amount of saltiness for you. - Optional: Add liquid sweetener to taste.

Choose your sweetener: rich simple syrup, agave nectar, and honey are good options I think peanut butter needs a little sweetening, to balance any salt added and to complement the roasted nut flavor. Start by drizzling 1 teaspoon of the sweetener of your choice over the peanut butter, mixing it in thoroughly and tasting. Need more? Add in another ½ teaspoon and taste again. You know the drill. I used 1½ teaspoons of rich simple syrup (4 ounces of organic cane sugar combined with 2 ounces of water, brought to a boil, then cooled.)
- Store your peanut butter in a covered container in the refrigerator.
It should keep for about two months. - To soften chilled peanut butter, spoon peanut butter into a microwave-safe container and heat for 15-second increments at 50% power.


One thought on “Cook Local: DIY Crunchy Peanut Butter”